flume_自定义source
Damoncai 2/5/2019 flume
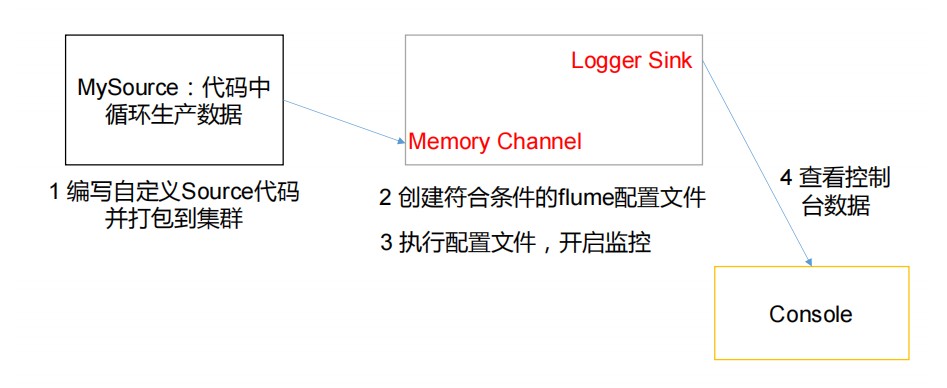
# 自定义Source
MySource 需要继承 AbstractSource 类并实现 Configurable 和 PollableSource 接口
实现相应方法:
getBackOffSleepIncrement()//暂不用
getMaxBackOffSleepInterval()//暂不用
configure(Context context)//初始化 context(读取配置文件内容)
process()//获取数据封装成 event 并写入 channel,这个方法将被循环调用。
使用场景:读取 MySQL 数据或者其他文件系统
需求
使用 flume 接收数据,并给每条数据添加前缀,输出到控制台。前缀可从 flume 配置文件中配置。

编码
依赖
<dependencies>
     <dependency>
         <groupId>org.apache.flume</groupId>
         <artifactId>flume-ng-core</artifactId>
         <version>1.7.0</version>
     </dependency>
</dependencies>
1
2
3
4
5
6
7自定义实现类
package com.atguigu;
import org.apache.flume.Context;
import org.apache.flume.EventDeliveryException;
import org.apache.flume.PollableSource;
import org.apache.flume.conf.Configurable;
import org.apache.flume.event.SimpleEvent;
import org.apache.flume.source.AbstractSource;
import java.util.HashMap;
public class MySource extends AbstractSource implements
Configurable, PollableSource {
 //定义配置文件将来要读取的字段
 private Long delay;
 private String field;
 //初始化配置信息
 @Override
 public void configure(Context context) {
 delay = context.getLong("delay");
 field = context.getString("field", "Hello!");
 }
 @Override
 public Status process() throws EventDeliveryException {
 try {
 //创建事件头信息
 HashMap<String, String> hearderMap = new HashMap<>();
 //创建事件
 SimpleEvent event = new SimpleEvent();
 //循环封装事件
 for (int i = 0; i < 5; i++) {
 //给事件设置头信息
 event.setHeaders(hearderMap);
 //给事件设置内容
 event.setBody((field + i).getBytes());
 //将事件写入 channel
 getChannelProcessor().processEvent(event);
 Thread.sleep(delay);
 }
 } catch (Exception e) {
 e.printStackTrace();
 return Status.BACKOFF;
 }
 return Status.READY;
 }
 @Override
 public long getBackOffSleepIncrement() {
 return 0;
 }
 @Override
 public long getMaxBackOffSleepInterval() {
 return 0;
  }
  }
1
2
3
4
5
6
7
8
9
10
11
12
13
14
15
16
17
18
19
20
21
22
23
24
25
26
27
28
29
30
31
32
33
34
35
36
37
38
39
40
41
42
43
44
45
46
47
48
49
50
51打包上传
将写好的代码打包,并放到 flume 的 lib 目录(/opt/module/flume)
配置文件
# Name the components on this agent
a1.sources = r1
a1.sinks = k1
a1.channels = c1
# Describe/configure the source
a1.sources.r1.type = com.atguigu.MySource
a1.sources.r1.delay = 1000
#a1.sources.r1.field = atguigu
# Describe the sink
a1.sinks.k1.type = logger
# Use a channel which buffers events in memory
a1.channels.c1.type = memory
a1.channels.c1.capacity = 1000
a1.channels.c1.transactionCapacity = 100
# Bind the source and sink to the channel
a1.sources.r1.channels = c1
a1.sinks.k1.channel = c1
1
2
3
4
5
6
7
8
9
10
11
12
13
14
15
16
17开启任务
bin/flume-ng agent -c conf/ -f job/mysource.conf -n a1 -Dflume.root.logger=INFO,console1