flume_安装和入门案例
# Flume安装
上传文件并解压
将flume/conf下的flume-env.sh.template文件修改为flume-env.sh并配置 flume-env.sh文件
mv flume-env.sh.template flume-env.sh
vi flume-env.sh

export JAVA_HOME=/usr/java/jdk1.8.0_191-amd64
1
2
3
4
# 入门案例(NetCat Source)
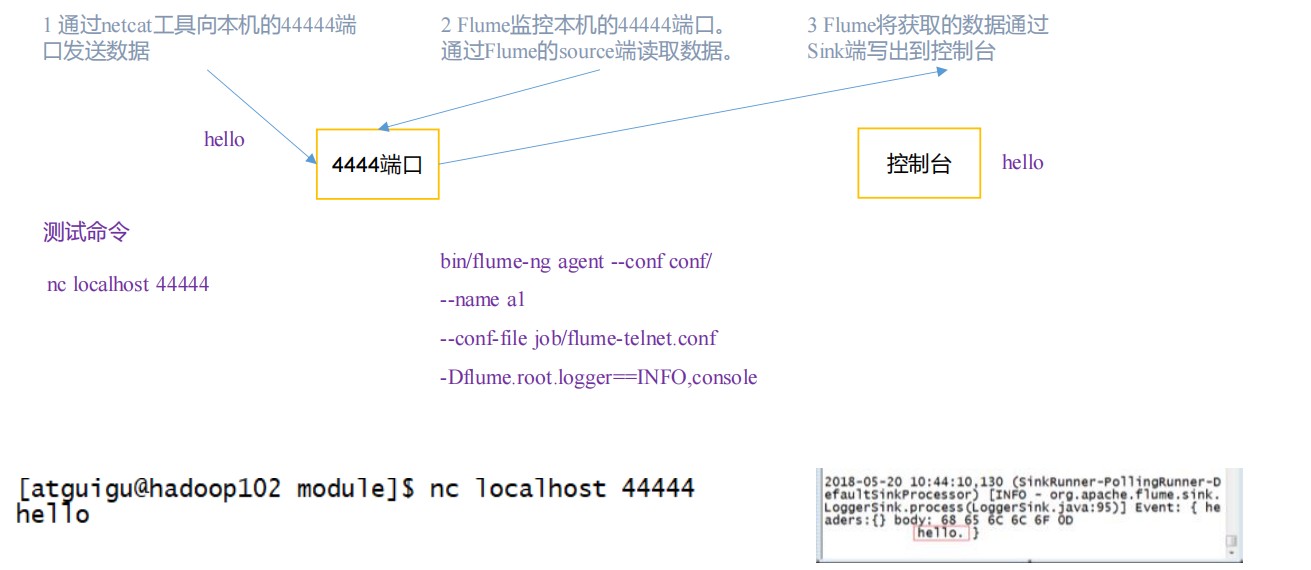
# 实现步骤
安装netcat工具
sudo yum install -y nc1判断 44444 端口是否被占用
sudo netstat -tunlp | grep 444441创建 Flume Agent 配置文件 flume-netcat-logger.conf
mkdir job
cd job/
1
2在 job 文件夹下创建 Flume Agent 配置文件 flume-netcat-logger.conf
vim flume-netcat-logger.conf

添加内容如下:
# Name the components on this agent
a1.sources = r1
a1.sinks = k1
a1.channels = c1
# Describe/configure the source
a1.sources.r1.type = netcat
a1.sources.r1.bind = localhost
a1.sources.r1.port = 44444
# Describe the sink
a1.sinks.k1.type = logger
# Use a channel which buffers events in memory
a1.channels.c1.type = memory
a1.channels.c1.capacity = 1000
a1.channels.c1.transactionCapacity = 100
# Bind the source and sink to the channel
a1.sources.r1.channels = c1
a1.sinks.k1.channel = c1
1
2
3
4
5
6
7
8
9
10
11
12
13
14
15
16
17
18
19
20
先开启 flume 监听端口
# 第一种
bin/flume-ng agent --conf conf/ --name a1 --conf-file job/flume-netcat-logger.conf -Dflume.root.logger=INFO,console

# 第二种
bin/flume-ng agent -c conf/ -n a1 -f job/flume-netcat-logger.conf -Dflume.root.logger=INFO,console

参数说明:
--conf/-c:表示配置文件存储在 conf/目录
--name/-n:表示给 agent 起名为 a1
--conf-file/-f:flume 本次启动读取的配置文件是在 job 文件夹下的 flume-telnet.conf
文件。-Dflume.root.logger=INFO,console :-D 表示 flume 运行时动态修改 flume.root.logger
参数属性值,并将控制台日志打印级别设置为 INFO 级别。日志级别包括:log、info、warn、error。
2
3
4
5
6
7
8
9
10
11
12
使用 netcat 工具向本机的 44444 端口发送内容
nc localhost 444441
# 实时监控单个追加文件(Exec Source)
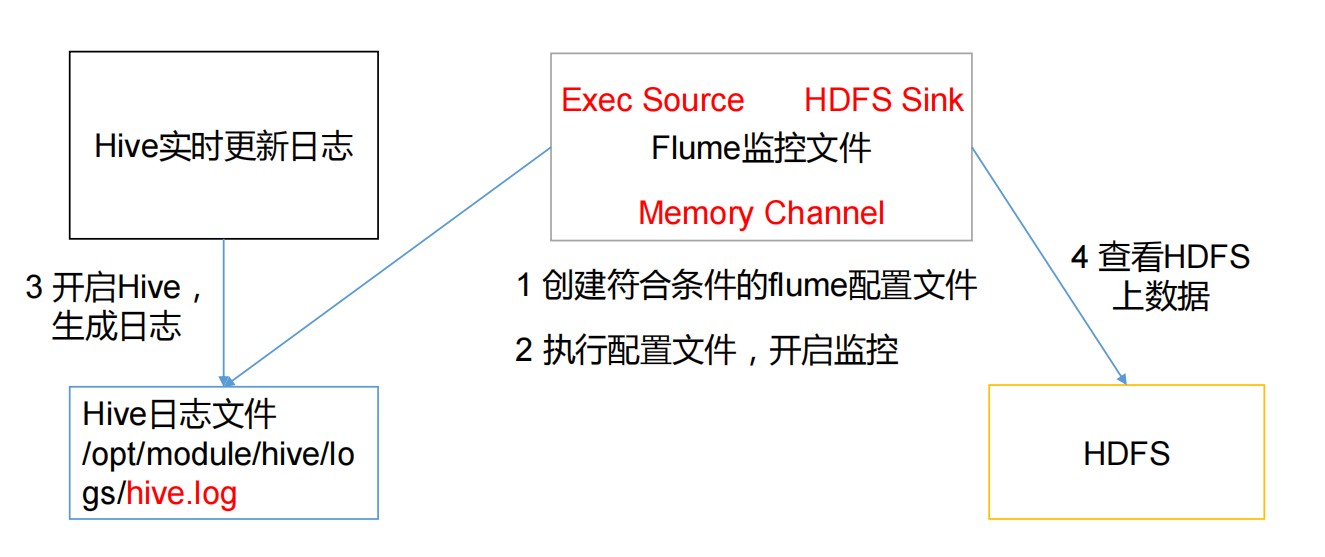
Flume 要想将数据输出到 HDFS,须持有 Hadoop 相关 jar 包
将

commons-configuration-1.6.jar、
hadoop-auth-2.7.2.jar、
hadoop-common-2.7.2.jar、
hadoop-hdfs-2.7.2.jar、
commons-io-2.4.jar、
htrace-core-3.1.0-incubating.jar

拷贝到/opt/module/flume/lib 文件夹下
1
2
3
4
5
6
7
8
9
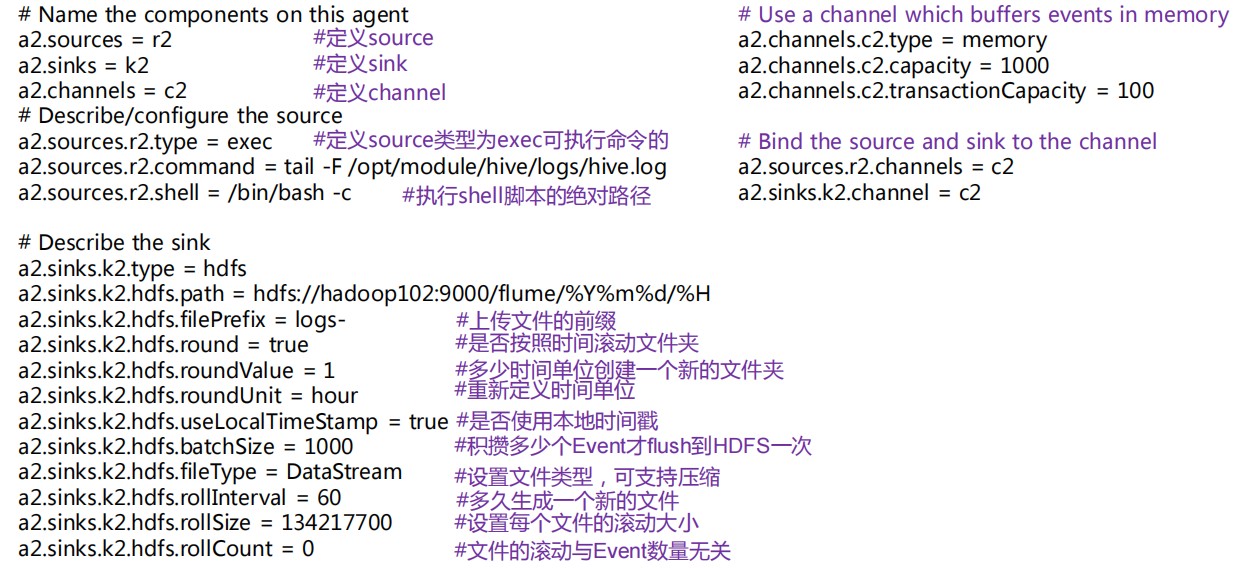
10创建 flume-file-hdfs.conf 文件
vim flume-file-hdfs.conf1添加内容
# Name the components on this agent
a2.sources = r2
a2.sinks = k2
a2.channels = c2
# Describe/configure the source
a2.sources.r2.type = exec
a2.sources.r2.command = tail -F /opt/module/hive/logs/hive.log
a2.sources.r2.shell = /bin/bash -c
# Describe the sink
a2.sinks.k2.type = hdfs
a2.sinks.k2.hdfs.path = hdfs://master:8020/flume/%Y%m%d/%H
#上传文件的前缀
a2.sinks.k2.hdfs.filePrefix = logs-
#是否按照时间滚动文件夹
a2.sinks.k2.hdfs.round = true
#多少时间单位创建一个新的文件夹
a2.sinks.k2.hdfs.roundValue = 1
#重新定义时间单位
a2.sinks.k2.hdfs.roundUnit = hour
#是否使用本地时间戳
a2.sinks.k2.hdfs.useLocalTimeStamp = true
#积攒多少个 Event 才 flush 到 HDFS 一次
a2.sinks.k2.hdfs.batchSize = 1000
#设置文件类型,可支持压缩
a2.sinks.k2.hdfs.fileType = DataStream
#多久生成一个新的文件
a2.sinks.k2.hdfs.rollInterval = 30
#设置每个文件的滚动大小
a2.sinks.k2.hdfs.rollSize = 134217700
#文件的滚动与 Event 数量无关
a2.sinks.k2.hdfs.rollCount = 0
# Use a channel which buffers events in memory
a2.channels.c2.type = memory
a2.channels.c2.capacity = 1000
a2.channels.c2.transactionCapacity = 100
# Bind the source and sink to the channel
a2.sources.r2.channels = c2
a2.sinks.k2.channel = c2
1
2
3
4
5
6
7
8
9
10
11
12
13
14
15
16
17
18
19
20
21
22
23
24
25
26
27
28
29
30
31
32
33
34
35
36
37
38注意:
对于所有与时间相关的转义序列,Event Header 中必须存在以 “timestamp”的 key(除非hdfs.useLocalTimeStamp 设置为 true,此方法会使用 TimestampInterceptor 自动添加timestamp)。
a3.sinks.k3.hdfs.useLocalTimeStamp = true
运行Flume
bin/flume-ng agent --conf conf/ --name a2 --conf-file job/flume-file-hdfs.conf1hadoop web查看文件
**注意:**有数据丢失或者重复问题
# 实时监控目录下多个文件(Spooldir Source)

创建配置文件
vim flume-dir-hdfs.conf1添加内容
a3.sources = r3
a3.sinks = k3
a3.channels = c3

# Describe/configure the source
a3.sources.r3.type = spooldir
a3.sources.r3.spoolDir = /opt/module/flume/upload
a3.sources.r3.fileSuffix = .COMPLETED
a3.sources.r3.fileHeader = true
#忽略所有以.tmp 结尾的文件,不上传
a3.sources.r3.ignorePattern = ([^ ]*\.tmp)

# Describe the sink
a3.sinks.k3.type = hdfs
a3.sinks.k3.hdfs.path = hdfs://master:8020/flume/upload/%Y%m%d/%H
#上传文件的前缀
a3.sinks.k3.hdfs.filePrefix = upload-
#是否按照时间滚动文件夹
a3.sinks.k3.hdfs.round = true
#多少时间单位创建一个新的文件夹
a3.sinks.k3.hdfs.roundValue = 1
#重新定义时间单位
a3.sinks.k3.hdfs.roundUnit = hour
#是否使用本地时间戳
a3.sinks.k3.hdfs.useLocalTimeStamp = true
#积攒多少个 Event 才 flush 到 HDFS 一次
a3.sinks.k3.hdfs.batchSize = 100
#设置文件类型,可支持压缩
a3.sinks.k3.hdfs.fileType = DataStream
#多久生成一个新的文件
a3.sinks.k3.hdfs.rollInterval = 60
#设置每个文件的滚动大小大概是 128M
a3.sinks.k3.hdfs.rollSize = 134217700
#文件的滚动与 Event 数量无关
a3.sinks.k3.hdfs.rollCount = 0

# Use a channel which buffers events in memory
a3.channels.c3.type = memory
a3.channels.c3.capacity = 1000
a3.channels.c3.transactionCapacity = 100

# Bind the source and sink to the channel
a3.sources.r3.channels = c3
a3.sinks.k3.channel = c3
1
2
3
4
5
6
7
8
9
10
11
12
13
14
15
16
17
18
19
20
21
22
23
24
25
26
27
28
29
30
31
32
33
34
35
36
37
38
39
40
41
42
43
44
启动监控文件夹命令
bin/flume-ng agent --conf conf/ --name a3 --conf-file job/flume-dir-hdfs.conf1说明:
在使用 Spooling Directory Source 时不要在监控目录中创建并持续修改文件
上传完成的文件会以.COMPLETED 结尾
被监控文件夹每 500 毫秒扫描一次文件变动
向 upload 文件夹中添加文件
mkdir upload
touch atguigu.txt
touch atguigu.tmp
1
2
3查看 HDFS 上的数据
# 实时监控目录下的多个追加文件(Taildir Source)
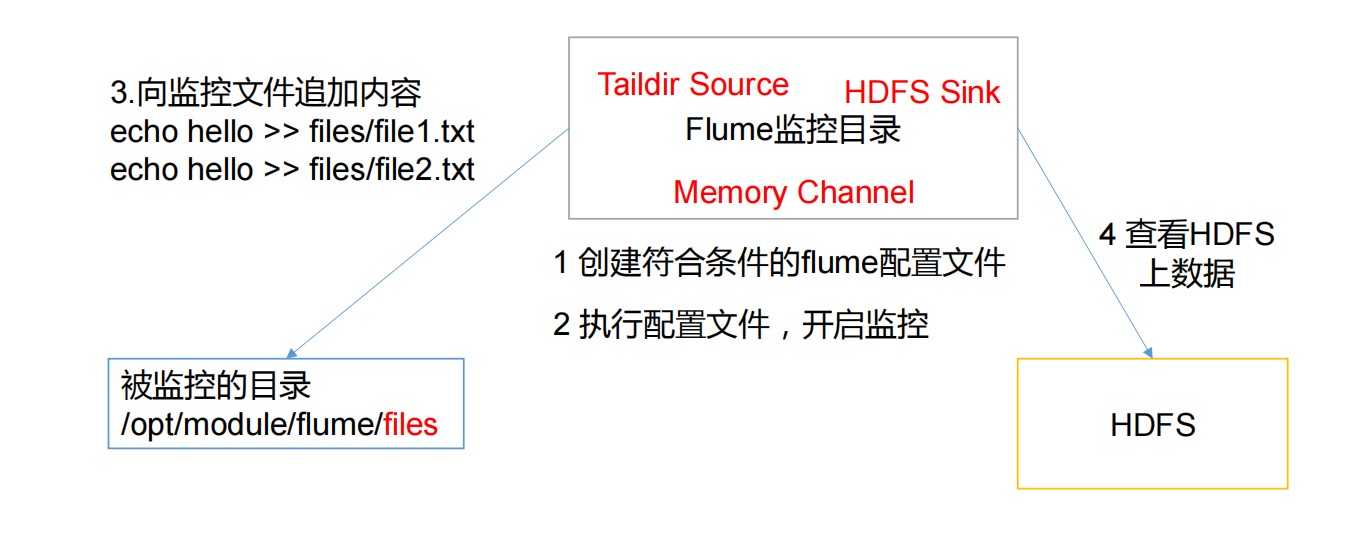
创建配置文件 flume-taildir-hdfs.conf
添加内容
a3.sources = r3
a3.sinks = k3
a3.channels = c3
# Describe/configure the source
a3.sources.r3.type = TAILDIR
a3.sources.r3.positionFile = /opt/module/flume/tail_dir.json
a3.sources.r3.filegroups = f1
a3.sources.r3.filegroups.f1 = /opt/module/flume/files/file.*
# Describe the sink
a3.sinks.k3.type = hdfs
a3.sinks.k3.hdfs.path =
hdfs://hadoop102:9000/flume/upload/%Y%m%d/%H
#上传文件的前缀
a3.sinks.k3.hdfs.filePrefix = upload- #是否按照时间滚动文件夹
a3.sinks.k3.hdfs.round = true
#多少时间单位创建一个新的文件夹
a3.sinks.k3.hdfs.roundValue = 1
#重新定义时间单位
a3.sinks.k3.hdfs.roundUnit = hour
#是否使用本地时间戳
a3.sinks.k3.hdfs.useLocalTimeStamp = true
#积攒多少个 Event 才 flush 到 HDFS 一次
a3.sinks.k3.hdfs.batchSize = 100
#设置文件类型,可支持压缩
a3.sinks.k3.hdfs.fileType = DataStream
#多久生成一个新的文件
a3.sinks.k3.hdfs.rollInterval = 60
#设置每个文件的滚动大小大概是 128M
a3.sinks.k3.hdfs.rollSize = 134217700 #文件的滚动与 Event 数量无关
a3.sinks.k3.hdfs.rollCount = 0
# Use a channel which buffers events in memory
a3.channels.c3.type = memory
a3.channels.c3.capacity = 1000
a3.channels.c3.transactionCapacity = 100
# Bind the source and sink to the channel
a3.sources.r3.channels = c3
a3.sinks.k3.channel = c3
1
2
3
4
5
6
7
8
9
10
11
12
13
14
15
16
17
18
19
20
21
22
23
24
25
26
27
28
29
30
31
32
33
34
35
36
37
启动监控文件夹命令
bin/flume-ng agent --conf conf/ --name a3 --conf-file job/flume-taildir-hdfs.conf1向 files 文件夹中追加内容
mkdir files

echo hello >> file1.txt
echo atguigu >> file2.txt
1
2
3
4查看 HDFS 上的数据
Taildir 说明:
Taildir Source 维护了一个 json 格式的 position File,其会定期的往 position File中更新每个文件读取到的最新的位置,因此能够实现断点续传。Position File 的格式如下:
{"inode":2496272,"pos":12,"file":"/opt/module/flume/files/file1.txt"}
{"inode":2496275,"pos":12,"file":"/opt/module/flume/files/file2.txt"}
2
注:Linux 中储存文件元数据的区域就叫做 inode,每个 inode 都有一个号码,操作系统用 inode 号码来识别不同的文件,Unix/Linux 系统内部不使用文件名,而使用 inode 号码来